From the this cookbook page, click the "Design Cookbooks Online" button. This will bring up another 'design window.' You may start creating your cookbook online. After the webpage loads you'll see a design window like the second graphic snapshot photo below with button options, add custom images option, and cover with other sections. Design your cookbooks online with ease.
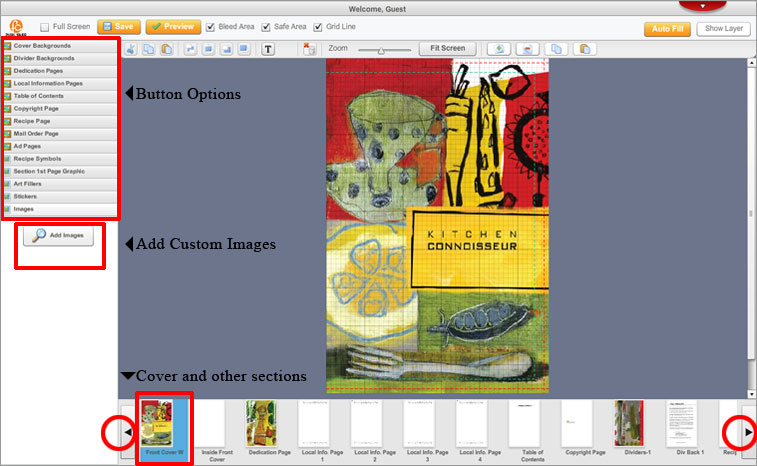
Notice, the main widow where the cookbook cover is located. On the left side are options, in button form. You must click these options to the corresponding thumbnail graphics at the bottom of the screen. These thumbnail graphics at the bottom of the screen (starting with the cover), are the pages inside your cookbook. To navigate to the previous or next page, click the black arrows (at the bottom of the screen). Let's get started.
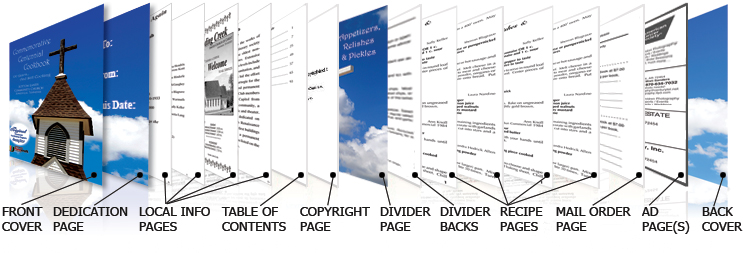
1) FRONT COVER- Under the "Add Images" button on the left side, you may add custom images to include a custom personal cookbook cover design, or you may choose one of our cover designs. (*Remember, to upload a high-resolution 300 dpi JPG image, if you want a custom cover design.) Otherwise choose one of our cover designs. Choose on the left side under 'Cover Backgrounds' >> Front Cover. Now drag one of our cover designs to the main window.
2) INSIDE FRONT COVER- Note, this is a blank page for your cookbook.
3) DEDICATION PAGE- Choose from the 'Dedication Pages' button on the left side. Now drag one of our dedicated page designs to the main window. Or you may add a custom image under the "Add Images" button.
4) LOCAL INFO PAGE- Choose from the 'Local Information Pages' button on the left side. Now drag one of our local info page designs to the main window. *Note, these graphics or clipart can not be resized. There are four (4) local info pages.
5) TABLE OF CONTENTS- Choose from the 'Table of Contents' >> Layouts button. Now drag one of our Table of Content designs to the main window. Now edit and customize your Table of Contents, by clicking on the text in the main window.
6) COPYRIGHT PAGE- Choose from the 'Copyright Page' button on the left side. Now drag one of our copyright page designs to the main window. There are two (2) choices for your copyright page.
7) DIVIDERS- Choose from the 'Divider Backgrounds' >> 'Appetizers,Relishes & Pickles,' Color button; or >> 'Appetizers,Relishes & Pickles,' B/W button. Now drag one of our divider designs to the main window.
*Note, under the "Add Images" button on the left side, you may add custom images to include a custom personal cookbook divider design, or you may choose one of our divider designs. (*Remember, to upload a high-resolution 300 dpi JPG image, if you want a custom divider design.)
*Note, you may choose Color or B/W for the remaining six (6) dividers. Click the corresponding button, and drag the divider design to the main window. The 7 recipe sections are as follows.
(Appetizers,Relishes & Pickles),(Soups,Salads & Sauces), (Meats & Main Dishes), (Vegetables),(Breads,Rolls & Pastries),(Cakes,Cookies & Desserts),(Beverages,Microwave & Miscellaneous).
8) RECIPE PAGE 1- Now start typing your recipes. To start typing click the "T" tool near the top of your screen. You will notice a text box - outlined in yellow. Highlight the text "Please Enter Text" and begin typing. Note, you can leave your layout as 1 column of text or more common, create 2 columns. If you want 2 columns drag the edge of the text box to the dotted blue line, and move it near the top under the recipe name, to align on the left side or column. Then create another text box and fit it to the right column. Now you have 2 columns of text for your recipe. *REPEAT this step for 2 columns of text on each recipe page for 2 columns. These columns are for your ingredients, then below are your directions for the recipe. *Note, type your corresponding recipes into the corresponding sections of the cookbook.
*Note, type all your recipes. Now you may add 'Recipe Symbols.' These small graphics usually go beside your recipe titles. To add 'Recipe Symbols' click the 'Recipe Symbols' button. Now drag one of our recipe symbols to the main window. *Note, you may not resize these graphics, but yes place them on the page where you desire.
9) MAIL ORDER PAGE- Now include your Mail Order Page so people can order your cookbook. Include your complete address, and the price, so others may purchase your cookbooks.
10) AD PAGES- These two (2) pages are for you to include advertising in your cookbook. These Ads may come from businesses, organizations, etc. There are six (6) different size Ads. The sizes include full page, 1/2, 1/3, 1/4, 1/6 & 1/8 size Ad page. *Note, customers must include a high-resolution 300 dpi JPG image, for you to upload. *Note, if you have the customer(s) logos and/or artwork, you may design the Ad online, then type the text to complete the Ad, directly into this online designer.
11) INSIDE BACK COVER- Note, this is a blank page for your cookbook.
12) BACK COVER- Under the "Add Images" button on the left side, you may add custom images to include a custom personal cookbook back cover design, or you may choose one of our back cover designs. (*Remember, to upload a high-resolution 300 dpi JPG image, if you want a custom back cover design.) Otherwise choose one of our cover designs. Choose on the left side under 'Cover Backgrounds' >> Back Cover. Now drag one of our back cover designs to the main window. *Note, your cookbook should now be complete. Make sure to click "SAVE" then "PREVIEW" for a preview of your cookbook.